
Tags
cake pops, centerpiece, DIY, MOPS, paper
We had our annual MOPS (Mothers of Preschoolers) tea last week. It was a wonderfully uplifting time spending time with some uplifting girls.
As a leadership team, we wanted it to be a special gathering, so we upped our game from our usual decor. We used real tablecloths, mismatched teacups (how shabby chic!), and I made centerpieces.
I wanted the centerpieces to serve two purposes: centerpieces and favors for the girls after the tea. I decided to incorporate cake pops and make paper flowers to fill the arrangements.

Unfortunately, with Mr. Man running around, I was just thankful to get them all to the tea in one piece and didn’t have time to stop and take pictures. A friend did take one picture at the tea.
Materials:
-Vases or other containers
-Styrofoam
-Paper Flowers: cardstock, hot glue, wire, 7mm pompoms
-Tissue paper for filler
-Cake pops (cake, frosting, candy melts, Crisco, sprinkles, lolly pop sticks, treat bags)

Make Cake Pops
There are a million tutorials online (like here). I took a few tips from here and there. Essentially, you:
1. Make a cake (I chose chocolate).
2. Crumble the cooled cake in a food processor.
3. Mix in just enough frosting (I chose more chocolate) by hand to hold the crumbs together.
4. Roll the mix into balls.
5. Melt the candy melts. I use a small dip sized crockpot on low stirring every few minutes. This time I added 2 teaspoons of Crisco to the melts to thin them out some. The results were fabulous. Once everything is melted together, I turn the crockpot to warm or off.
6. Take the pops out of the refrigerator and insert lollypop sticks first dipping the sticks into the melted chocolate to act as glue.
7. Then dip the entire pop into the chocolate and place into a block of styrofoam. Add sprinkles and wait for chocolate to harden. (Or for a different look like the Sneetch pops at Bradley’s birthday, you can place them on wax paper).
8. Bag them up using treat bags (I used “small treat bags” from Hobby Lobby).
Make the Flowers
Roses

1. Cut a 12″x12″ sheet of cardstock into nine 4″x4″ squares. Each square makes one rose.

2. Cut each square into a rough circle.
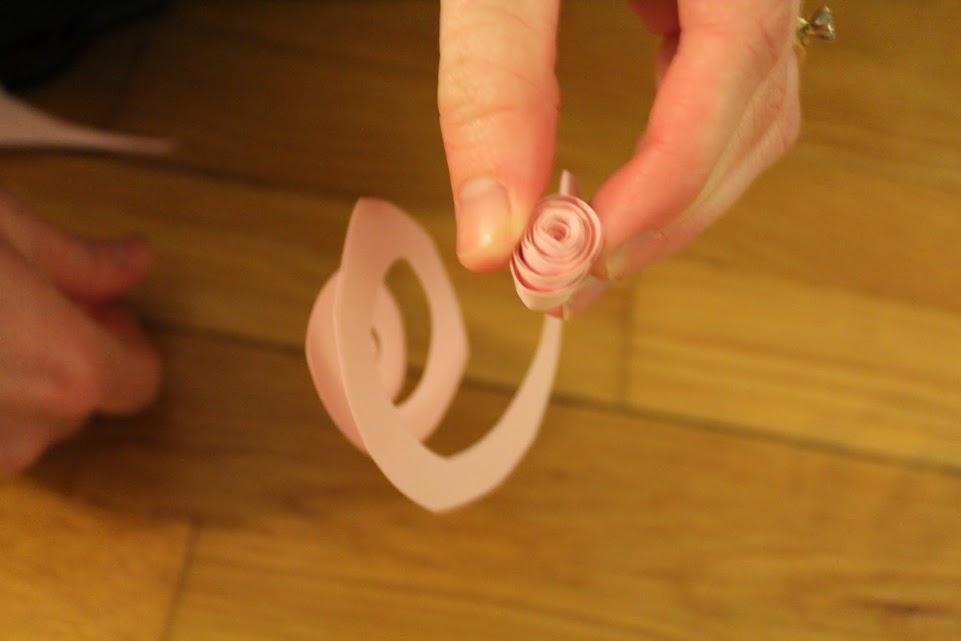
3. Starting at the outside of the circle, cut a continuous spiral.

4. Starting on the outside of the circle, roll the paper into itself. The outside of the circle is the inside of the rose.

5. Continue rolling until the reach the inside of the spiral.
6. Attach a piece of floral wire to the bottom of the rose with a dab of hot glue.
Cherry Blossoms

These probably aren’t meant to look like cherry blossoms, I just don’t know the name of the flower they are meant to look like. They are cute though.
1. Cut out this shape.

2. Using a straight pen, poke a hole in the middle of the cutout.
3. Insert a piece of floral wire (with a small loop at one end) into the hole.

4. Secure the floral wire with a dab of hot glue and immediately place a 7mm pompom on top of the glue to hide the glue and wire.
5. Gently bend the four petals toward the center.
Make tissue paper filler
1. Fold four pieces of 20″x20″ tissue paper back and forth accordion style about 1″ wide.

2. Cut the folded tissue in half. Each of these will make the filler for one centerpiece.

3. With a piece of floral wire, secure the middle of the folded tissue paper.

4. With scissors, trim ends of tissue into a V shape.

5. Separate layers, gently pulling away from center one at a time to create a hemisphere pouf.

Preparing Vase
1. After trying glass vases and realizing that there was no classy way to cover the styrofoam, I changed gears to mini buckets that look like galvanized steel from the Target Dollar aisle.

2. I added marbles to the bottom to help weigh it down.
3. Cut styrofoam to fit the top of vase (Dollar Tree carries great blocks!).

Assembling centerpiece
About this time, my faithful cheerleader looked at me like “really…you’re not done yet?!?” Love him.

1. Place the tissue paper pouf in the center of the vase.

2. Add cake pops to the vase being careful to put pressure on the stick of the cake pop and not the cake part. If they are stubborn going into the styrofoam, use a wooden skewer to poke a pilot hole.
3. Add the flowers to fill out the arrangement.
Here is one of the centerpieces after all the cake pops had been removed showing that with bigger/more flowers this could make a beautiful centerpiece on its own without cakepops

More inspiration for great paper flower bouquets from Etsy seller Inspired Designs.
Overall, they were a labor of love for my awesome mom friends/encouragers.

